How do I perform a manual Studio 5000 project merge if I'm unable to use the Copia Advanced Merge Tool?
This article describes the steps to use the Logix Designer Compare Tool instead of Copia's Advanced Merge Tool to merge Studio 5000 project files.
In the event that Copia's Advanced Merge Tool for Studio 5000 is unable to satisfy your needs for merging Studio 5000 projects, you can always use Rockwell's native compare and merge application called the Logix Designer Compare Tool. We will refer to this tool as the LDCT for the rest of this article. This tool is typically installed alongside Studio 5000. The user manual for this tool can be found here, and the current version (9.02.00) of the PDF is attached to this article here: Logix Designer Compare Tool User Manual - Version 9.02.00.
Normally, when you open a PR that has conflicting Studio 5000 changes, you'll see the option to open the Advanced Merge Tool to resolve the conflicts. This option is generally preferred for most users.
However, there are certain instances in which the Advanced Merge Tool may not have enough functionality for what you are trying to accomplish. For example, you may not be able to use the Advanced Merge Tool if:
- Your project(s) contain modules with EDS files that are not installed on or are not compatible with Copia's servers. You can still use the Advanced Merge Tool in this scenario, but you'll need to manually create an .ACD from the .L5X
- Users have made edits to the same routine or AOP in both branches and you want to include both sets of edits
If this is the case, the next best option is to use the LDCT's merging functionality to manually merge your projects. The high-level steps for this workflow are laid out below.
- Download both versions of the .ACD file to your local computer. You can do this in a few different ways, but the fastest is generally to download them directly from the Copia web app. We recommend that you rename the files with the branch name added to the end of the filename to avoid confusion.
- (Optional) Download the version of the .ACD file immediately prior to when you created the branch. You can use this as the "Original content" file in the LDCT. Rename the file to indicate that this is the original file, such as adding -original to the end of the file name.asdf
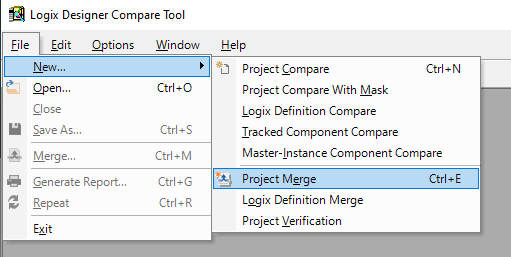
- Open the LDCT
- Start a new Project Merge

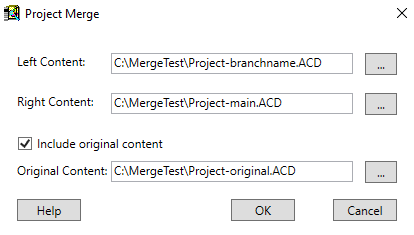
- Enter the file paths in the popup as seen below and click "OK"

- Follow the LDCT user manual instructions to perform the merge. Save the result of the merge using the exact file name that is used in the repository
- Commit and push this manually-merged result to the sub-branch that you are merging in the PR
- You can use the Copia desktop or web apps to commit this file
- Tip: Include a commit message that makes it clear that you used the LDCT to perform the merge. For example: Manually merged files from the 'main' branch (3372b75) and the 'test-branch' branch (ec030aa) using the Logix Designer Compare Tool
- Return to the PR in the web app and refresh the page. Ensure that the manually merged file shows up in the activity on the PR, and then click "Overwrite <BRANCH_NAME> Branch".

- This step should only be done once you are confident that you've manually merged your projects successfully, as it ignores the conflicts and force merges the most recent version of the .ACD file from the sub-branch
That's it! You've now manually merged the Studio 5000 project and have merged the two branches.
Elements of the UI may have changed since the time of posting. For the most up-to-date information, refer to our Documentation.